

Guide
LoRaMaker creates Stable Diffusion models quickly in your browser in minutes, without the need of a GPU. This is powerful tool for enthusiasts to get the most of our building a model without limits.
What’s a LoRa used for?
LoRas are commonly used for AI avatars, but they’re not just for people. Create a LoRa of products, pets, yourself, your friends, visual effects, lighting conditions, props, landscapes or anything else.
How can I use the LoRas that I make?
LoRaMaker is now part of the Graydient service, so there are image creation apps right in the browser. You can train your model and begin using it right away without downloading or setting up anything on your PC. You can even do this from an old slow smartphone, too.
Get Started
Login to my.graydient.ai and click the LoRaMaker icon, or create an account
Beta Testers: If you registered before our 2024 launch and redesign, please sign up as a New User but with your existing account email. You won’t be charged twice or lose your old images, our login system is new, and it will link account after you verify the email.
How Training Works
You are training the AI with a pattern. The training method is easy and non-technical: You will be uploading images and describing them. The quality of the images and the quality of the image captions plays a huge role in the quality of the LoRa. This cannot be understated. You can import great images, write bad captions, and get a bad result. Amateur mistake.
Our mission is to not only to teach you how to use our software, but also to teach you how to become a good trainer, and how to balance and optimize your data sets, which we call a Catalog. We recommend blocking out 1 hour of your time to make the most of this tutorial.
You also don’t have to learn this alone: Get help and report bugs in the LoRaMaker Beta Tester support group
Quick Overview
Your LoRA model requires specific kinds of pictures, not just clear and pretty ones.
Here’s the TLDR essential info:
Aim for at least five good pictures, or 26 high-quality photos with a mix of full-body shots, medium shots from the chest up, and close-ups—6, 10, and 10, respectively. Ensure consistency by avoiding optical discrepancies, dark or blurry images, and any that alter the subject’s typical appearance, like extreme facial expressions or accessories. Images should be clear, at least 512×512 pixels, and ideally square (1:1 aspect ratio). Each photo should be unique, offer variety in lighting and time, and include informative captions. Avoid images with multiple subjects or repetitive backgrounds, as these can confuse the AI.
What to expect
The model training itself is very fast, ready in a few minutes. Our servers are very fast. Depending on your goals, you’re either done in 3 minutes or 6 hours. When the system is done, it will give you a unique tag to add to your prompts. Check the “How to Prompt” section below for more details.
Absolute Beginners: Create an artistic likeness first, before trying to make a real person, because it usually takes Pros a few tries, too.
How long it takes depends on the quality of photos and how accurate we are at writing captions. These two things make a huge difference. We asked a professional model trainer: It comes down to balancing the data set and prompts — the last 20% can mean the difference of a very high resemblance or something that’s a little uncanny.
When you get that a-ha moment, it’s totally worth it:

If you are creating a general LoRa to create a similar face in many art styles, such as fantasy and illustration, it is MUCH easier than trying to create a realistic carbon copy of someone. This is because the captions for realistic photos and careful photo selection require practice, observation, retesting, and time. Unless the person has typical similar features to the people in the base model, and you know how to prompt for those features, you will have some testing to do.
This is why we’ve partnered with Graydient so you don’t have to worry about running up training bills and all your test renders are free and unlimited, too.
Finding your way around
![]()
The Catalog tab is your Data Set. Every model needs at least FIVE images in its data set or it will not complete its training. This is the minimum. Please see Figure A above for minimum requirements and best practices before uploading.

The Finetunes tab is where your completed and in-process models will appear. It will send a Telegram notifications. You can also refresh the Finetunes page to check if it’s done, too. The column that says concept is the trigger word that goes into your prompt.
So if I want to use the model above, I would write <jon-carnage> in my prompt and also add <realvis51> (not pictured) which is the base art style that corresponds with it. The word Realvis51 comes from our models page, which you can pair to make a LoRA model bend it into any art style. We’ll touch on this in detail below in Prompt Advice, you don’t have to worry about this right now.
Adding Images from the Web
You can add photos three ways. You can directly upload a photo (top right) from WebUI. JPG photos work best. If you are using a VPN, it may slow your speeds. Our data center is located in the East Coast of the US.
Adding Images from Telegram
Reply to a photo in Telegraph with the /catalog command. You can also upload to Telegram and write the /catalog command as the caption. The photo must be sent as a “photo” and not an attachment.
Turn compression ON when sending images. This won’t hurt the likeness, the effect is very mild.
Tip for Samsung phone users: don’t use the shortcut method to add photos, go the long way into the file manager, then upload it.

The bot will display a confirmation when the image is cataloged, with its item number. The item numbers are not important, they are for debug purposes.
The configuration screen

Jump down to Tip #10, we explain the above fields in detail.
Important: The prompt field is what you will be writing to activate your lora. Don’t forget that phrase. Write it down right now, that’s the activator.
Mastery: The 10 Best Practices

We’ve asked top model trainers how they make their sauce. This is what they said.
Tip #1 – Quality over Quantity
Start with five great photos. Look at our five photos critically and make sure that they are unmistakably the same person. what You will need a minimum of five (5) images. In our testing, we have found that the golden number is (26) photos. Do not repeat photos. Especially do not repeat photos with different captions! Bad!
More photos can produce worse results, because it introduces the risk of more inconsistencies and hurried captioning. Don’t overwork yourself or cut corners.
What makes a good data set?
Our software includes a Catalog – a place to store all of your photo ideas and select the ones that go into the final model, the Data Set. A data set must contain at least five images.
Use photos taken at different times of the day.
Different days, different lighting work best.
To use an imperfect analogy: If you do an exercise the wrong way 195 times out of 200, you don’t get bigger muscles — you get an injury. Make each rep count.
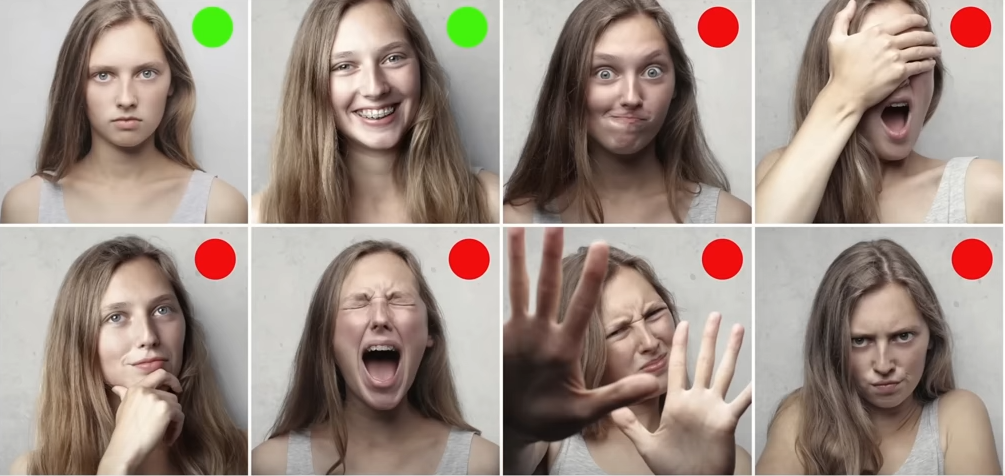
Here are some examples of good and bad photos, but even the two “good ones” have discrepancies. Does she have a chin dimple, and is her eye color still green in #2?
FIGURE A
If you are absolutely sure you have 200 good photos and the quality is still bad, you’re either wrong or your captions are the problem. We do a deep dive into captions down below.
Tip #2 – No props, no costumes
Makeup vs. Natural – If a person’s best look is a certain kind of make-up, only upload images with that makeup. Otherwise their features will be confused and subject to the biases of the base model for what makeup is supposed to look like, which can add unwanted matte or gloss, or different eyebrows and lips.
Generally speaking, Stable Diffusion makes women’s faces rounder with fuller lips. Otherwise, the person may look different. If the accessories are very bold and may cause a training distraction, consider removing them or inpainting them out of the photo before uploading.
You learned in rule #1 that it’s a bad image when the face is covered by hands. This also applies to sunglasses, facial glitter, and other foreign objects. No costumes. These things will often cause mutations. The AI already knows what costumes and glasses are, so you can prompt for those sorts of things later.
Be picky. Because training bad data is hard to pluck out. It’s not a less is more thing, it’s a quality thing. Imagine you are the robot and you are confused if these photos are actually of the same person. Obsess over this.
Tip #3 – Check for the “fat” in lights
Shadows and Light can create the illusion of slimness of heaviness, shaper facial features just as much as makeup does. Does the person appear to be roughly the same weight on all of the photos? A certain shadow or dress can add 10 pounds or make a face look rounder or thinner! If you have those borderline images, toss those.
Do any of the angles make facial features look sharper, rounder, bigger, smaller than the other photos? Toss those out.
Avoid photos that are dark, blurry, or make the person look different from the other photos. Expert model makers are taking each photo into Lightroom and color correcting them, every image! You don’t have to do this, but the best of the best do.
Tip #4 – Crop your own images
Manually trim the fat, and set the focus: Again, not a requirement, because our software will actually crop the images for you if the face is too far away. For those highly concerned with quality, doing your own 1:1 crops are a good idea.
The images should be very clear and at least 512×512. Square, 1:1 photos work best.
Tip #5 – No special guests
One person per image, always: Don’t upload photos of multiple people in one image, even if you are describing them as two different people in the caption. This will hurt the training. You can create multiple models, so a focused model about 1 thing is best.
To add multiple people into a photo, use Inpaint instead.
Let’s look at this example:

While helping a customer improve the likeness of their model, we noticed this caption read “Person’s Name headshot”
If we are a robot and these captions taken literally, we have just learned that every photo of Person must have a (fused?) dog next to their face. (Cursed!)
Are all of your portraits in the same room, at the same hour, with the same light? That will make a very rigid model. We call this “overtraining” – See the note in Figure A about removing backgrounds and different lighting conditions to solve this.
Don’t take anything for granted. Be detailed and throw out photos that may confuse or trick Stable Diffusion.
Tip #6 – Make backgrounds flexible
Keep the backgrounds varied, or remove them completely.
If all of your photos have the same background, it will be very difficult to prompt a different outcome. If different photos are not possible, we recommend using the background remove command on your photos first.
Backgrounds or Not?
For example, if all of your photos are in a bedroom, it will be harder to prompt for things like “cyberpunk spaceship background” because the AI will have “trained” on the bedroom for multiple steps on every image.
Tip #7: Caption your images methodically
Captions are NOT prompts, don’t add commands inside captions
We asked the team that worked on a very popular NSFW model and various LoRAs, and to our surprise they told us that they take an average of SIX HOURS to caption and rebalance and rebuild their LoRAs constantly before they are satisfied. Wow! You don’t have to do that, but it just to show how much work goes into some of these popular models.
Commas and periods are OK. Avoid other punctuation marks in captions. Don’t add commands or ((weights)) or [[negatives]], use natural language
It makes sense: Your favorite Stable Diffusion models were painstakingly captioned, each image tagged with great precision. The best model makers study the render results and blame the bad photos in their data sets for the bad results, and train again. If you have this mindset, you will achieve your goals. Otherwise, every model would be great, and there is clearly a difference in quality between certain models.
Don’t use more than 77 tokens. Tokens are words or parts of words that Stable Diffusion uses to understand your prompts. This topic itself deserves its own guide. For the purposes of this tutorial, as long as your prompt isn’t a two paragraphs, you’re probably fine. Aim for 2-3 descriptive and clear sentences.
Make your captions map to how you will prompt in the future. If you will be prompting for a brunette, then the word brunette must go into your caption. Otherwise, it will strongly pull biases from the base model for that token.
Each image must be cataloged one by one. You can provide a caption for the photo by adding it after /catalog as you upload, and edit it again later in the Catalog system. You will have a chance to check all captions one more time before building the model.
TAG MANAGERS – FOR THE PROFESSIONAL CAPTIONER
We recommend first writing down the description of what the person looks like on a spreadsheet. Do they have a unique nose, do they have a heart-shaped face or is it more of a triangle shape, are their features more masculine or are they soft and round? These things are important to write down. The hair color, the eye color. Think about the unique characteristics and also the situations the photos are in. This free tag management software pictured below is recommended as it will keep you organized and give you a clear battle plan on what to balance out if the quality of your LoRA is not what you had hoped.

The top model makers are people who suffer for their incredible work. While it’s possible to toss up a few instagram pictures and get a LoRa back in 3 minutes, we want to set your expectations correctly. Making a good model requires good curation, an attention to detail, and discipline. You should expect the first model to be a little off.
Tip #8 – Balance your Data Set
Picking good images was the easy part. Tagging them was more difficult. Now comes the hardest part: Balancing what you did.
Look at Figure A again. Think about the additive effect of telling the AI that this person makes crazy faces 8/10 times. So, in a regular situation they must be crazy-looking 80% of the time? If we submitted these 10 images that what we are reinforcing with training. The average sum here is unbalanced. Be very picky!
FAQ: What percent should be mug shots and body poses?
If body poses and body likeness are important to you, use 6 photos of full body or entire object + 10 medium shot photos from the chest up + 10 close-ups. Otherwise, only focus only on headshots.
After you try the model, think about how each image, their caption, and the weight of the other images played a role in your results. When you know your prompt is on point but the image is a little off, try removing images from the catalog and building the model again until the balance is just right. Kind of like cooking, isn’t it?
- Choose Stable Diffusion 15 for the most flexible results, the best for stylish avatars. This is not the one you want for creating a “deepfake” real person, it will bend a lot based on the base model that you pair it with.
- You can choose a fine-tuned model Realistic Vision 51 for real people, but first run one of your captions on that model to understand it’s biases. Does “redhead woman” look like what you expect? That woman will look totally different in Deliberate2, so know the biases and pick the right model. The tradeoff is that it will be less flexible for other art styles.
Tip #9 – Know the base model biases
Each base model has a bias of what a man and woman are supposed to look like.
Boob size, nose shape, hair style, skin color. The fullness of a woman’s lips. How often window’s peaks appear. Dimples. Every base model has a completely different likeliness of when these things appear.
We strongly recommend trying your target prompt WITHOUT your LoRa first to see what you are working with. When you add your model without a weight, it will influence it by 0.7 (maximum is 2). Adjust the weight and also your prompt to iron out the biases out of the final result.
This means that if you write “a portrait of a brunette” and Realvis51 has more European images trained than Stable Diffusion 1.5, the resulting image will be less Asian. There is no objective perfect result for what a brunette or an Asian person looks like. Asian could mean more South Asian, for example. (Darker skin)
Your training has to be aware of those biases, and then caption and prompt to beat those biases. Some base models are harder to override on their biases.
Some models are harder to prompt for than others. So at run time, your model might be fine but your weights and prompts might also need tuning based on the model and its biases, as we have already mentioned.
Tip #10 – Optimize the token and prompt
The final step when building the Lora, the point of no return
Once the LoRA is built, there is no way to change it. You can train a new LoRA with the same data set though. We don’t throw out your saved Catalog images.
With at least five images selected, click Train Lora in the header or Create Lora in the footer. They both do the same thing. You’ll be presented with a few menu options before the training begins.
Checklist of things to complete before clicking Create Concept:
- A friendly name — this is just for your FYI, it won’t effect the image
- The concept name — you can’t determine this yet. It will be your friendly name plus a few numbers, so keep your friendly name short
- Token — this is the unique word for your the subject, not the trigger word for your LoRa. This should be a cryptic weird word that cannot be confused with something else that Stable Diffusion knows. A good trigger is yxheehgge. A bad trigger is Susan, Lola, Rita. Those already have a meaning.
- Prompt — This is the activation phrase to use your LoRA, the thing you must repeat and the most important thing is that it must contain the Token word you just made up.
- Don’t forget the base model. The base model will have the biggest impact on how flexible the model is. Check the bias info in Tip 9 about this.You may want to create multiple versions of a model until you make one that suits your goals. There’s no penalty for experimentation. If you’re not familiar with the names from the pulldown menu, search for them in our models page to see a preview.
Important: The prompt field is what you will be writing to activate your lora. Don’t forget that phrase. Write it down right now, that’s the activator.
And you’re almost done!
What happens next: The system will build the model and give you a Trigger or Concept name back. At this point, we still do not have the name for the model, so we cannot use it. Wait for it to appear in the fine tunes menu.
This is explained in the Getting Around section above (see Fine-Tunes diagram)

How to use your Lora correctly
- Repeat the prompt section word-for-word exactly as you trained it (see Concept Configure screen above)
- Repeat the base concept in your prompt. It is not embedded in the LoRA. (That would take hours)
- Try adding /guidance:7 — how strictly the AI should follow your idea. A max is 20 for very strict, and at 0 its creepy.
- Correct: a photo of zhzhzy person <happyguy134> <realvis51>
- Wrong: a photo of Susan, a brunette <happyguy> (did you train the word brunette or Susan? is it in the token or config prompt? if you don’t specify the base model, it will look like an illustration
Please be kind to your humble LoRA trainer servers
At the risk of sounding like one of those hotels that puts up a Save The Earth sticker to lower their laundry bills while the whole staff drives Diesel Ford F150s, there is a compute cost every time we train a LoRA, there is a compute cost (to Graydient, not you) every time a LoRA is created, so please use this resource responsibly so we can offer this product at a low price to others. Don’t smash build unless you mean it.
Troubleshooting
My LoRA says “waiting” for over an hour
Unfortunately this could mean that the process has failed. Try again with less images and make sure the captions don’t have any special characters.
Realistic Model: My LoRA doesn’t look like me or the subject
PREP
If this is your first time, welcome to the club! You went from being a LoRa first time maker to now being a LoRa first time optimizer. You need to scrutinize your data set, captions, your prompt, and configuration and try again. Olivio Sarikas has a great video on this, and much of his advice is already on this page. Most of the features in the video are available on our platform, including the 4X Ersgan Upscaler (it’s our native one).
WEIGHTS
You can control how much or how little to enforce the training with weights. The default weight of a LoRa is 0.7. So <mustacheguy:0.8> is 1x more influential, and <mustacheguy:0.6> lowers it by 1x. If you get blue squares, tuning this helps.
OPTIONS
If the base model <realvis51> isn’t a good fit, try other realistic base models like <natural-sin> from our models page. Click models at the top of your webui and filter by realistic for hundreds of possibilities.
An error like “unhandled” has occurred when rendering
If you are using other LoRas in combination with your custom model, like a pose or effect or background, this can happen. It may mean that model is new or not correctly installed. Please contact us in VIP support chat and we’ll fix this for you asap.
Thanks for reading this far!
We hope this guide was useful. If you haven’t started yet, we’re offering a 7-day free trial – please take us up on it